MythClient Usage Guide
This guide explains how to set up and use MythClient to watch MythTV recordings on a Windows PC.
Install MythClient
MythClient provides both a 64-bit and a 32-bit installer. Download the right one for your system from track7’s software section. If you don’t know which one is right for you, check How Many Bits for help. This guide will assume the 64-bit installer is right — if you need to use the 32-bit installer the steps are almost identical.
The download is an MSI installer file. To install MythClient, run that file. The installation wizard window comes up to introduce itself. Click Next to advance to the setup type window. Click the button for Typical to install MythClient to the default location with a start menu shortcut. You may alternately choose Custom to specify an alternate install location, install a desktop shortcut, or avoid installing the start menu shortcut. Click Install to install MythClient.
Configure MythClient
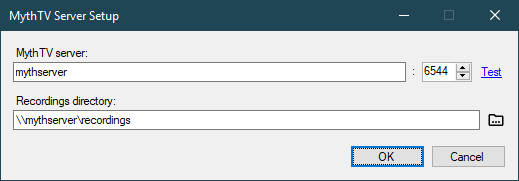
When MythClient first launches, it will start with the configuration window.

Enter the name (or IP address) of your MythTV server in the first field and the port in the second if you’re not using the default. Use the Test link to verify that it brings you to the MythTV WebFrontend page (it shows the last 10 recordings). Enter the path to MythTV recording files in the third field. This is generally a UNC path (starts with two backslashes) or a path on a mapped drive letter. The directory should contain video (ts or mpg) and screenshot (png) files (MythClient only uses the video files).
To change any of these settings in the future, click the vertical dots icon in the MythClient toolbar and choose Settings to get back to this window.
